Wing mirrors are the perfect part to start wrapping with: they're small, very visible and the change is instant. In gloss black or carbon fibre, they go with a black roof or a chrome delete and give the car a sporty edge. 50 cm of vinyl does both mirrors. The only difficulty is the curve of the housing, and here we explain how to deal with it.
What you need
- Vinyl: a 50 × 152 cm roll (€25.99 in the standard range) covers both mirrors with room for a mistake or two.
- Tools: a felt-edged squeegee, a fine-blade cutter and wrapping gloves, which let you slide your hand over the vinyl without marking it.
- A heat gun or a powerful hairdryer, isopropyl alcohol and microfibre cloths.
Which finish to choose
- Carbon fibre: the most popular. Premium gloss black carbon looks like the real thing, and 3D carbon fibre, with a raised weave, has a more racing feel. We explain the differences in types of carbon fibre vinyl.
- Gloss black: gloss black mimics the piano black mirrors of sporty trims. It looks great with the roof in the same colour.
- Chrome: black chrome gives a very exclusive mirror-like shine. It's the trickiest to fit and to look after, so it's best if you already have some practice.
You'll find all the recommended finishes on our wing mirror wrap page.
Remove the housing or not?
On many cars the mirror cover clips off or comes away with a couple of screws, and wrapping it on a table is more comfortable: you can fold the vinyl inside without rushing. Before you do, look up how it comes off on your model; if you're not sure, don't force it. You can wrap it perfectly well in place, covering the glass with tape or folding the mirror in to work more easily.
Step by step
- Clean thoroughly. Wash the housing, dry it and degrease it with isopropyl alcohol, including the edges and the underside. Work under cover, between 15 and 25 °C.
- Cut the vinyl. One piece per mirror, with about 10 cm spare on each side. If it's carbon, cut both pieces in the same direction from the roll so the weave matches.
- Position the vinyl. Remove the backing paper and lay the vinyl over the highest part of the housing, centred. Our vinyl is repositionable: if it's not right, lift it and lay it again.
- Squeegee from the centre. Start on the flattest area and work towards the edges, always from the centre outwards.
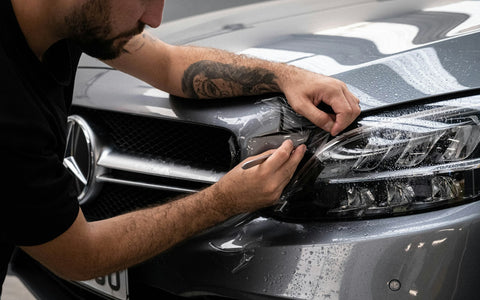
- Heat on the curve. Warm the vinyl with the heat gun, keeping it moving, until it softens. Stretch it evenly, pulling both sides at once, and lay it down. If a crease forms, lift, heat and stretch again.
- Relief cut if needed. Where the curve is too tight, make a small cut and overlap 3–5 mm, hidden along a line of the part.
- Fold and trim. Fold the excess inside the housing and trim it with the cutter. If you leave the edge on the visible face, it will end up lifting.
- Seal. Go over all the edges with heat and press down with a gloved finger.
Afterwards, wait 48 hours before washing the car so the adhesive bonds fully.
If you don't remove the housing
Fold the mirror in or turn it by hand to get at the back. Cover the glass with masking tape so you don't scratch it with the cutter, and trim the vinyl right at the joint between the housing and the glass surround, with the blade held at a shallow angle. Then tuck the edge under with the squeegee.
Indicator and glass
If the mirror has a built-in indicator, trim the vinyl carefully around it and leave it uncovered: lights must never be covered. And wrap only the housing, never the glass. These are two basic rules at the roadworthiness test (the NCT in Ireland, the tehnoülevaatus in Estonia, the annual technical inspection in Bulgaria). More in is it legal to wrap your car?
Mistakes worth avoiding
- Stretching it cold. The vinyl goes back to its shape and lifts on the curve. Heat first, then stretch.
- Too much heat. Overheated vinyl gets thin, and on 3D carbon the texture flattens out.
- Cutting the piece too small. Without spare you have nothing to pull on and you can't fold the edge inside.
- A crooked weave. With carbon, keep the weave straight to the lines of the mirror, and the same on both sides.
To complete the look
Black or carbon mirrors look even better with a matching roof and a chrome delete on the window trims. 3 m of gloss black covers all three. If you'd like to see it step by step, start with how to wrap a car roof, and have your tools ready with the DIY car wrap kit.
Frequently asked questions
How much vinyl do I need for the wing mirrors?
50 cm of 152 cm roll does both, with some to spare. If you're also doing the roof, add those 50 cm to the roof length and cut everything from one piece.
Is it hard to wrap a wing mirror?
It's easier than a bumper and harder than a roof. The only tricky part is the curve: with heat and even stretching, it comes out well. If you get it wrong, you only lose a small piece of vinyl.
Which finish is easiest to fit?
Gloss black and carbon fibre are the most forgiving. Chrome is the most delicate: it marks easily and needs more practice.
Can I cover the indicator on the mirror?
No. Lights must stay exactly as visible as before. Trim the vinyl around the indicator and leave it uncovered.